One of the perks of being a freelance translator is the freedom to work from anywhere – all you need is an internet connection and computer. However, once you have more than one computer, it can get pretty messy pretty fast. Here are some tips to keep you sane when you’re working across multiple devices.
Make use of the cloud (Dropbox, Sync, pCloud)
You’re probably already using cloud storage, whether or not you’re aware of it. Many services will save your data “in the cloud”, which essentially means it’s on one or more servers somewhere and ready for you when you need it.
Cloud storage like Dropbox is essentially a folder you share across all your devices – for example your desktop PC, your laptop, and your phone. If you add a file on your desktop PC, it’ll appear on your laptop and phone as well. Similarly, if you delete a file via your phone, it will disappear from your laptop and PC as well.
How I use the cloud as a freelancer
I use the cloud for three purposes:
- To store things I need to have accessible at all times
- Active projects (contracts, reference files, etc.)
- Useful templates (templates of invoices, contracts, quotes,…)
- Pricing chart (if someone emails to ask “how much would it cost to…”)
- CV/resume
- To store important files I can’t lose
- Travel documents (PDFs of airline or train tickets)
- Digital copy of my passport and driver’s license
- Tax info (invoices, receipts, etc. – anything an accountant would care about)
- Address book
- To share files across devices (or with other people)
- Translation files (for sharing files if I collaborate on a project with someone else)
- Photos (pictures I take with my mobile phone are automatically uploaded to my PC)
- More photos (photos of events like weddings are shared with my family in a shared Dropbox folder)
- My AutoHotkey script
- Keepass file (in case I forget a password)
Where to get free cloud storage space
Many cloud storage services offer a limited amount of space for free, such as:
Dropbox
2GB of free storage space, plus an extra 500 MB (for you and me) if you go through my referral link. This is my favorite service and also a very common one. I often have clients share files with me via Dropbox.
Sync
5GB free space, plus 1GB extra (for you and me) if you go through my referral link.
pCloud
10 GB free space. It’s a bit unclear to me if you get more via my referral link. This one appears not as a folder, but as it’s own drive name.
Use memoQ across computers with the Language Terminal
This is a big one and it took me a while to figure this out. (Actually, someone on Proz explained it to me.)
memoQ allows you to use your license on two computers, but if you sometimes use your desktop PC and at other times your laptop, cloud solutions don’t really work. This might be because memoQ has their own cloud solution to sell you.
I’ve tried installing memoQ on pCloud on both computers and I’ve also tried simply storing the memoQ files on a cloud folder, but to no avail. You need to use the Language Terminal.
How to backup your files to the Language Terminal in memoQ
- In the project view, choose the project you want to upload.
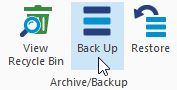
- Choose Backup in the Archive/Backup group.
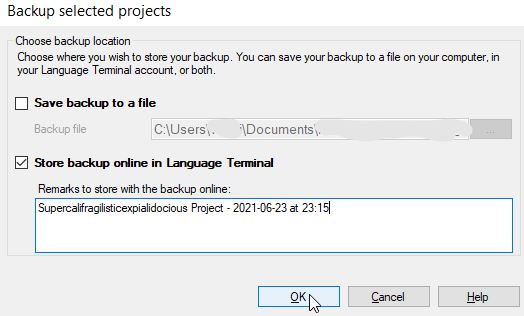
- Pick Store backup online in Language Terminal
- Give it a name to make sure you always know which one is the most recent.
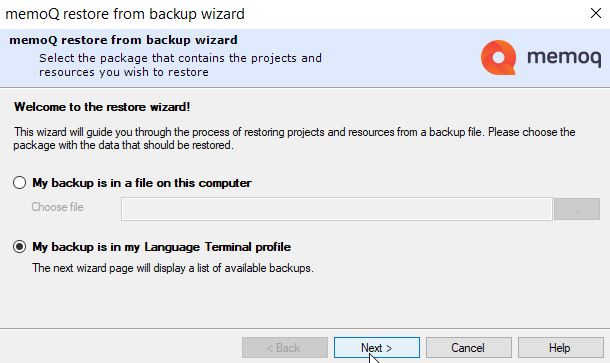
To restore your memoQ project files on your second machine, these are the steps to follow:
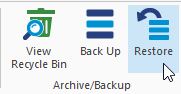
- In the project view, choose Restore in the Archive/Backup group.
- Choose My backup is in my Language Terminal profile > Next.
- Pick the correct version of your file, then click Next.
And that’s really all there is to it. The most difficult part is to remember to do it.
Use a password manager
Password managers help you remember your passwords and are more secure than that Post-it stuck to your screen. If you work across two or more devices, you might find that password you saved in your browser to be gone from your memory when you try to log in on your phone.
This is why I recommend a password manager.
The way I use mine is to have Keepass installed on all my devices (with Keepass2Android on my phone) while keeping the Keepass file in my Dropbox folder. This way I can access the file with my passwords from anywhere.
I also recently discovered 1Password, which makes browser-based passwords in particular very smooth to deal with.
Keepass vs. 1Password
Keepass
Keepass is a free and simple password manager available for a huge range of devices. Keep your Keepass file in the cloud and you can look up any password on the go on your phone. (See keepass.info.)
1Password
Has more features than Keepass, e.g. a shared vault for passwords or other secret info you share with your family or spouse. Also saves and enters your credit card details or addresses automatically via a browser add-on. 1Password is not free (unless an employer uses a business plan and they give you a free family plan to go with it). Current price (6/2021) is $2.99/month. (See 1password.com.)
Use an online email service
I’m late to the party with this one, as everyone else seems to be using Gmail online across all devices. That’s one way of doing it if you predominantly use one email address.
I used to use Thunderbird as my email client for a long time and simply downloaded my emails on every device with the “Leave messages on server” option. Another way of dealing with an email client across devices is to use IMAP, so if you create folders or read emails on one device, the change is reflected on another.
In the end, this turned out to be a massive headache, especially when I got more into blogging and affiliate marketing and I found myself with a ludicrous number of email addresses (21 and counting!).
Free email providers
Obviously there are many email providers that are entirely free, such as:
They’re all fine and they’ll do what you want. For a professional freelancer, I always recommend getting your own domain so you can have a more professional-looking email address.
However, you need to keep this in mind:
If you’re not the customer, you’re the product.
– Tom Johnson
In other words, Google, GMX and any of the other ones wouldn’t offer you a free email service if you didn’t make them money – by producing data they can sell or use for targeted advertising.
That’s why after years and years of using free email services, I decided I was ready to value my privacy and that of my customers and actually pay for my email service.
Fastmail
In the end, I decided to go with Fastmail and I haven’t looked back since. They have a free trial and I use their standard plan for $50/year that gives me 30GB of storage space. They also have a 30-day trial so you know what you’re getting into. (You can get 10% off in the first year with this referral link.)
They don’t show ads, they don’t use tracking, they don’t sell my data. Fastmail also has a very decent mobile app.
I use the webmail interface through my browser and it’s intuitive and easy and bundles all my email addresses into the same inbox. There’s also a great search function, the option to pin messages, a feature for taking notes, and their spam filter is good enough to filter out a lot of the spam and phishing emails I get every week.
If you’re into that kind of thing, you can also use their integrated calendar, although I personally am happy just having a decent email provider who keeps my data private.
And that’s it! I hope those tips helped you. If you have any additional ones, please feel free to leave them in the comments.